Current Topic: 4.3.3.Major concepts and steps of a Dynamic Web Project
You have a privilege to create a quiz (QnA) related to this subject and obtain creativity score...
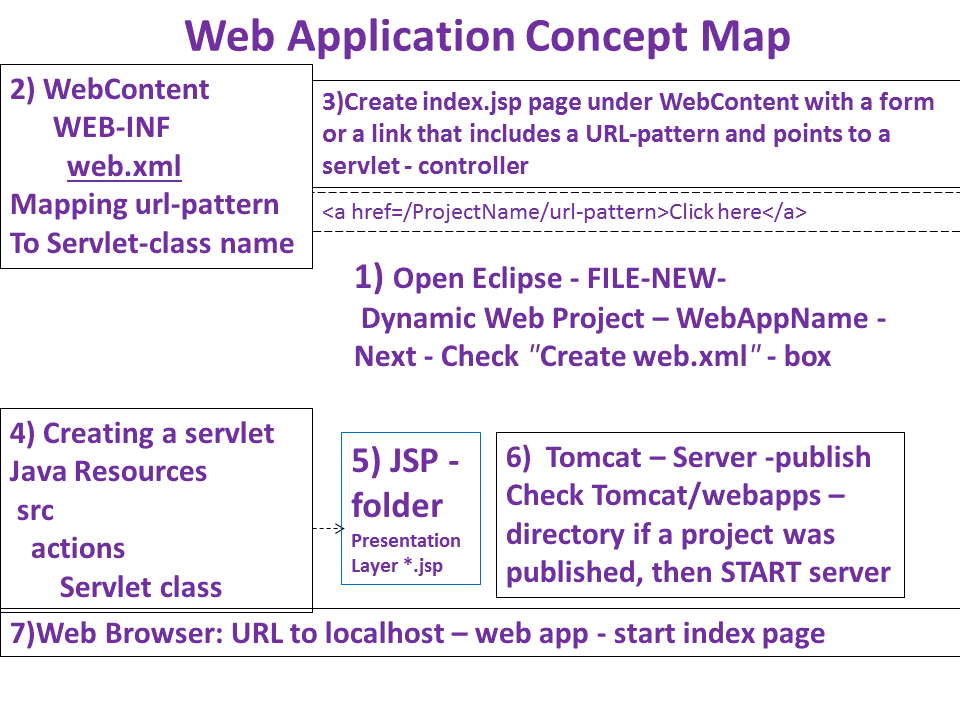
4.3.3.Major concepts and steps of a Dynamic Web Project
Regardless of the application server choice, creating web application includes several steps.
The image below presents these steps in the Web Application Concept Map.
1. Open Eclipse and create a new Dynamic Web project by using the following controls:
Open Eclipse - FILE-NEW- Dynamic Web Project ? provide the WebAppName - Next - Next
Check ?Create web.xml? checkbox - Finish
2. The Web Dynamic Project in Eclipse has Java Resources and WebContent folders.
In the Java Resources folder you can see the src folder where you will place your Java packages and source code.
Check the WebContent folder and find another directory with the name WEB-INF ? all capital. The WEB-INF directory with the folder lib (library of jar-files) and the file web.xml inside is expected in every Java-based web application according to Java Enterprise blueprints.
In the web.xml file we provide information for the application server.
In the example below we map the URLs in the web pages to specific servlets serving these URL patterns.
This is an example of this part of the web.xml file.
    actions.WelcomeServlet

    actions.WelcomeServlet


    actions.WelcomeServlet

    /Welcome
3. The next step is creating at least one web page with a URL that points to a web service, which is served by a servlet. This URL must include the URL pattern we provided in the web.xml file.
This URL pattern can be placed in a web form, for example a form with the login data. The first line of the form will look like in the sample below:
Was it clear so far? Highlight the text in question
Or
This html page consists of a single Submit button.
4. Note that the url-pattern /Welcome will be mapped to the actions.WelcomeAction servlet. Create this servlet: create the package actions under the Java Resources ? src ? directory. Create a new class in this package with the name WelcomeAction. Type from this sample below:
/**
* The WelcomeAction class extends HttpServlet
*/
public class WelcomeAction extends HttpServlet {
private static final long serialVersionUID = 1L;
/**
* @see HttpServlet#doGet(HttpServletRequest request, HttpServletResponse response)
*/
protected void doGet(HttpServletRequest request, HttpServletResponse response)
throws ServletException, IOException {
doPost(request, response);
}
/**
* @see HttpServlet#doPost(HttpServletRequest request, HttpServletResponse response)
*/
protected void doPost(HttpServletRequest request, HttpServletResponse response)
throws ServletException, IOException {
// start an HTML page
String html = "
Welcome Action Page - Show Request Parameters
";
// display all parameters in the Request object
for(Enumeration en = request.getParameterNames(); en.hasMoreElements(); ) {
String key = en.nextElement();
String value = request.getParameter(key);
html += "
key="+key+" value=["+value+"]";
}
html += "";
// send HTML back to a browser
response.getWriter().println(html);
}
}
5. In this sample the web page created on the server side in response to the request is very small, so there is no need of developing a Java Server Page for that purpose. The WelcomeAction servlet generated these several lines in the doPost method.
6. After you make sure that there is no red lines in the Eclipse project, publish the application and start the Tomcat server. To publish the dynamic web project you will need:
a) Right mouse click on the Tomcat server link in the Server view and select the Add and Remove option. Use this control to add the FirstWeb application to the server;
b) Another right mouse click on the Tomcat Server link and select the Publish option.
d) And one more right mouse click on the Tomcat Server link and select the Start option to start the server.
7. Open a web browser and enter http://localhost:8080/FirstWeb/html/welcomeForm.html When you see the Submit button, click on the button. This will send a request to the server. This request includes url-pattern /Welcome which points to the WelcomeAction servlet. The servlet will process the request with the doPost() method, which sends back to a browser the page with the list of keys and values that are present in the request.
8. Create 4 QnAs on the subjects described in this section and email to dean@ituniversity.us
9. Create another html page under the html directory, similar but a bit more complex than the welcomeForm.html.
10. Include in this page another url-pattern.
11. Add to the web.xml file this url-pattern and a servlet-mapping section similar to the existing.
12. The servlet-mapping section will map to another servlet class, which you will need to create under the actions package in the Java Resources ? src ? directory.
13. Re-publish the updated project and re-start the server. Make sure that the new html page has a button that sends the request, which triggers a new servlet, which in its turn produces a dynamic page back to the browser.
14. Compress the files, including web.xml, html files and Java sources in the actions package and send as 4.3.3.WebDynamic.Your.Name.zip to dean@ituniversity.us.
We invite you to create your own questions and answers (QnA) to increase your rank and win the Top Creativity Prize!
3. The next step is creating at least one web page with a URL that points to a web service, which is served by a servlet. This URL must include the URL pattern we provided in the web.xml file.
This URL pattern can be placed in a web form, for example a form with the login data. The first line of the form will look like in the sample below:
In this sample the WebAppName is actually the name of your Web Dynamic Project, and url-pattern is exactly the same as provided in the servlet-mapping section of the web.xml. In the sample above it was Lookup. Make sure that you respect low case and upper case letters.
4. In this step we plan and implement the Java Servlet, which will serve the url-pattern above. The name for this Java Servlet already defined in the web.xml file. In the sample above this was WelcomeServlet in the actions package. In the sample above the same Java Servlet is designated as a listener-class.
This is not necessary. They could be different classes and potentially different url-patterns can be served by different Java Servlets. In this case there will be several servlet-mapping and servlet sections in the web.xml file.
5. According to the Model-View-Controller Design Pattern, Java Servlet should only focus on business logic and delegate presentation layer to a Java Server Page.
At the end of the Java Servlet code, usually at the end of the doPost() method, you can find the following delegation lines:
<br/>request.setAttribute("results", results); // store results for JSP
<br/>RequestDispatcher rd = request.getRequestDispatcher(
<br/>  jspPath + pageName); // create a request dispatcher object
<br/>rd.forward(request, response); // forward request to a JSP
<br/>
In the Java Server Page we usually create a web page to present the results.
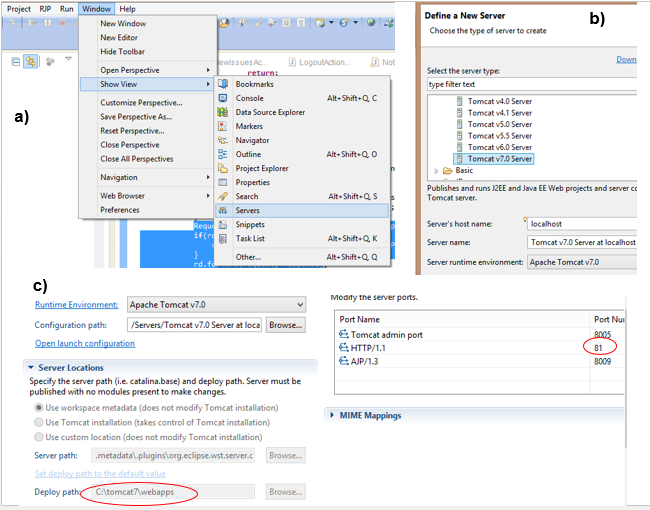
6. Did you make your Eclipse aware that Tomcat is on your machine?
Not yet? ? Let us do this now!
a) Open Eclipse and Navigate to the Menu ? Window ? Show View ? Servers
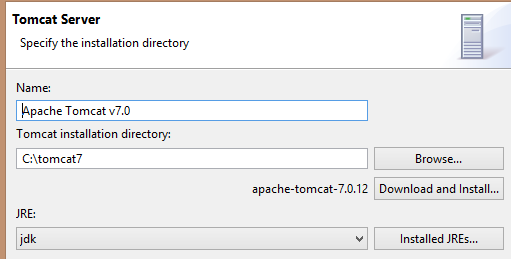
b) In the Define a New Server pop-up window select your version of Tomcat (Eclipse Kepler only knows about Tomcat 7, for later Tomcat versions you will need a later version of Eclipse.) Provide the Runtime environment with the Tomcat Installation directory, for example, c:/tomcat7 and point JRE to c:/jdk.
c) Check the new line Tomcat 7 Server at localhost in the Server view in Eclipse.
Double click on this line and check for several important factors in the Tomcat setup.
c.1 ? Look for the Ports and make sure that HTTP port is your desirable port. You can always change this port, just make sure that when you enter a URL in a browser, the port matches your setup.
c.2 ? Change the settings of the Deployment Path to your webapps directory, c:/tomcat7/webapps, so Eclipse will deploy your applications in the same place where you can run them with and without Eclipse.
c.3 ? Just above the Ports find the Timeouts control and change the Start Timeout to at least 300 seconds. This will allow more time for starting your application in Eclipse. It is especially convenient when you have some data initiation and debug you?re the process.
After all these changes are done Save the changes. This is a very important step. Eclipse is picky. If you did not save it now, you might not be able to save it later.
If this happens, no panic is necessary. Just do right-mouse click on the server line and delete the server. Then just repeat a, b, c again.
7. To check that you did it right, right-mouse click on the server line in Eclipse and START the server.
Then you can open a browser and enter http://localhost:8080 (or whatever port you setup) and enjoy a Tomcat Welcome Page.
Make sure that the line form action=... in the HTML source below reflects a proper port.
Another option is to use a relative path: form action="/FirstWeb/Welcome".
Assignments: 1. Create a Dynamic Web Project and name it FirstWeb.
2. Follow the steps described above. Add to the web.xml the servlet mapping between the url-pattern /Welcome and the Servlet actions.WelcomeAction as illustrated in the step 2.
3. Create a new folder in the WebContent of the project with the name html. Create a new file welcomeForm.html with the following content:
Was it clear so far? Highlight the text in question
Or onclick="window.location.href='/BASE/jsp/chat.jsp?issueID=127&ur=f'">
This html page consists of a single Submit button.
4. Note that the url-pattern /Welcome will be mapped to the actions.WelcomeAction servlet. Create this servlet: create the package actions under the Java Resources ? src ? directory. Create a new class in this package with the name WelcomeAction. Type from this sample below:
<br/>package actions;
<br/>
<br/>import java.io.IOException;
<br/>import java.util.Enumeration;
<br/>import javax.servlet.ServletException;
<br/>import javax.servlet.http.HttpServlet;
<br/>import javax.servlet.http.HttpServletRequest;
<br/>import javax.servlet.http.HttpServletResponse;
<br/>
<br/>/**
<br/> * The WelcomeAction class extends HttpServlet
<br/> */
<br/>public class WelcomeAction extends HttpServlet {
<br/>	private static final long serialVersionUID = 1L;
<br/>	/**
<br/>	 * @see HttpServlet#doGet(HttpServletRequest request, HttpServletResponse response)
<br/>	 */
<br/>	protected void doGet(HttpServletRequest request, HttpServletResponse response)
<br/>			throws ServletException, IOException {
<br/>		doPost(request, response);
<br/>	}
<br/>
<br/>	/**
<br/>	 * @see HttpServlet#doPost(HttpServletRequest request, HttpServletResponse response)
<br/>	 */
<br/>	protected void doPost(HttpServletRequest request, HttpServletResponse response)
<br/>			throws ServletException, IOException {
<br/>		// start an HTML page
<br/>		String html = "<html><body><h2>Welcome Action Page - Show Request Parameters</h2>";
<br/>		// display all parameters in the Request object
<br/>		for(Enumeration<String> en = request.getParameterNames(); en.hasMoreElements(); ) {
<br/>			String key = en.nextElement();
<br/>			String value = request.getParameter(key);
<br/>			html += "
<br/> key="+key+" value=["+value+"]";
<br/>		}
<br/>		html += "</body></html>";
<br/>		// send HTML back to a browser
<br/>		response.getWriter().println(html);
<br/>	}
<br/>
<br/>}
<br/>
<br/>
5. In this sample the web page created on the server side in response to the request is very small, so there is no need of developing a Java Server Page for that purpose. The WelcomeAction servlet generated these several lines in the doPost method.
6. After you make sure that there is no red lines in the Eclipse project, publish the application and start the Tomcat server. To publish the dynamic web project you will need:
a) Right mouse click on the Tomcat server link in the Server view and select the Add and Remove option. Use this control to add the FirstWeb application to the server;
b) Another right mouse click on the Tomcat Server link and select the Publish option.
d) And one more right mouse click on the Tomcat Server link and select the Start option to start the server.
7. Open a web browser and enter http://localhost:8080/FirstWeb/html/welcomeForm.html When you see the Submit button, click on the button. This will send a request to the server. This request includes url-pattern /Welcome which points to the WelcomeAction servlet. The servlet will process the request with the doPost() method, which sends back to a browser the page with the list of keys and values that are present in the request.
8. Create 4 QnAs on the subjects described in this section and email to dean@ituniversity.us
9. Create another html page under the html directory, similar but a bit more complex than the welcomeForm.html.
10. Include in this page another url-pattern.
11. Add to the web.xml file this url-pattern and a servlet-mapping section similar to the existing.
12. The servlet-mapping section will map to another servlet class, which you will need to create under the actions package in the Java Resources ? src ? directory.
13. Re-publish the updated project and re-start the server. Make sure that the new html page has a button that sends the request, which triggers a new servlet, which in its turn produces a dynamic page back to the browser.
14. Compress the files, including web.xml, html files and Java sources in the actions package and send as 4.3.3.WebDynamic.Your.Name.zip to dean@ituniversity.us.
We invite you to create your own questions and answers (QnA) to increase your rank and win the Top Creativity Prize!